
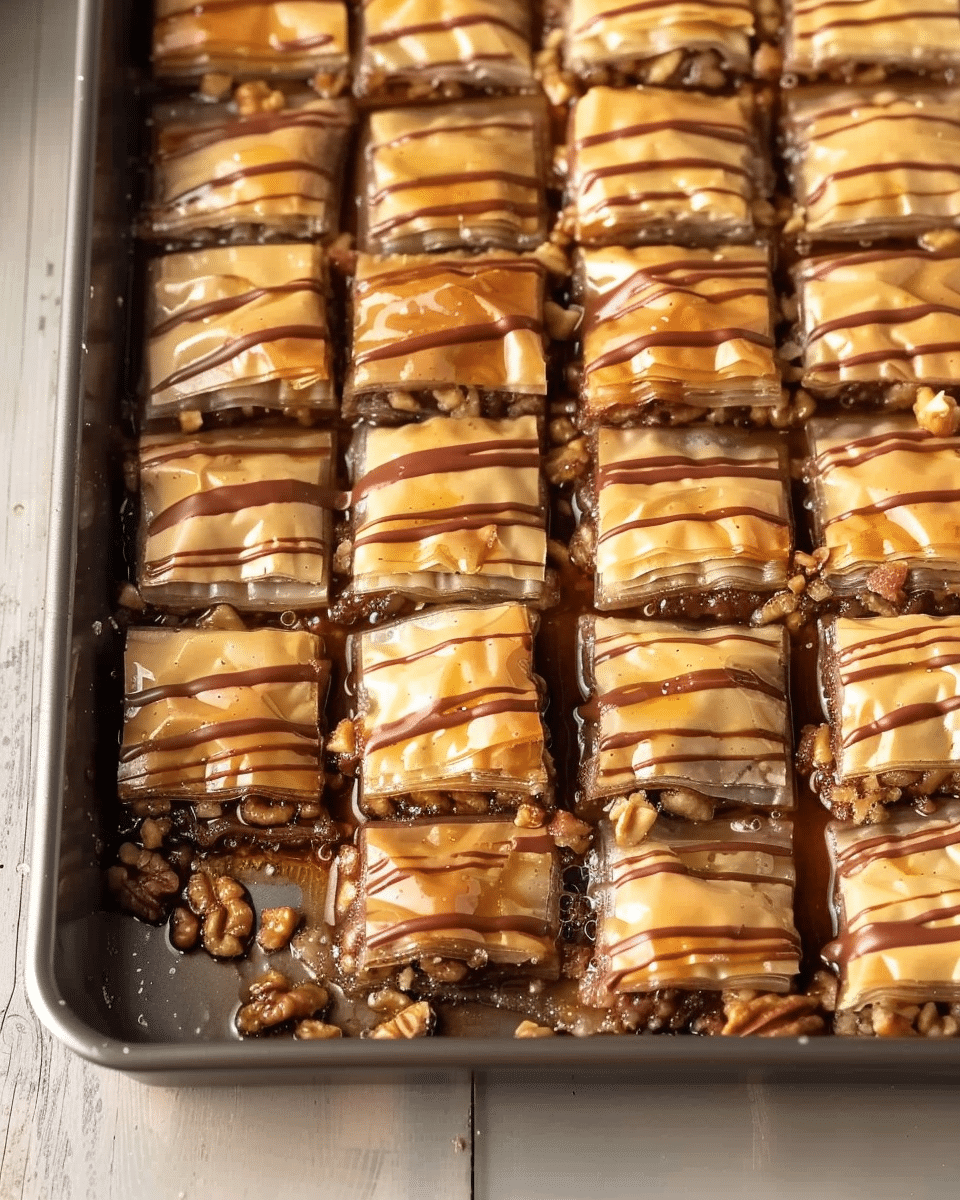

Nutella Baklava is a decadent twist on the classic Middle Eastern pastry, combining the rich, hazelnut-chocolate spread of Nutella with the buttery, flaky layers of traditional baklava. This fusion brings together the best of both worlds—crispy phyllo dough, a sweet and nutty filling, and a deliciously gooey syrup that adds sweetness and moisture. Whether you’re hosting a party or indulging in a personal treat, Nutella Baklava is sure to impress with its unique and irresistible flavor.
Why You’ll Love This Recipe
Nutella Baklava offers the perfect balance of sweetness, crunch, and creamy richness. The hazelnut-chocolate spread adds an extra layer of indulgence to the flaky, buttery texture of traditional baklava. Each bite has a satisfying crunch from the phyllo dough, a luscious center filled with Nutella, and a sticky-sweet syrup that soaks into the layers for a melt-in-your-mouth experience. This twist on baklava is easy to make and is a must-try for Nutella lovers!
Ingredients
For the Baklava:
-
1 package phyllo dough (16 oz), thawed
-
1 cup Nutella (or more, depending on preference)
-
1/2 cup unsalted butter, melted
-
1/2 cup chopped hazelnuts (or walnuts, pistachios, if preferred)
-
1/2 teaspoon ground cinnamon (optional)
For the Syrup:
-
1 cup granulated sugar
-
1/2 cup water
-
1/4 cup honey
-
1 teaspoon lemon juice
-
1 teaspoon vanilla extract
(Tip: You’ll find the full list of ingredients and measurements in the recipe card below.)
Directions
1. Prepare the Phyllo Dough:
-
Preheat your oven to 350°F (175°C). Lightly grease a 9×9-inch (or similar size) baking pan with melted butter.
-
Carefully unroll the phyllo dough. Place a damp kitchen towel over the dough to keep it from drying out while you work with it.
2. Assemble the Baklava Layers:
-
Place one sheet of phyllo dough in the prepared baking pan and brush it generously with melted butter. Repeat this process, layering 8-10 sheets of phyllo dough, brushing each sheet with butter.
-
Once the base is formed, spread a thin, even layer of Nutella over the phyllo dough. Sprinkle a small amount of chopped hazelnuts and cinnamon (if using) over the Nutella for added texture and flavor.
-
Continue layering 4-5 sheets of phyllo dough, buttering each layer. Then, add another layer of Nutella and nuts. Repeat until you have used all of the Nutella and hazelnuts, ending with a layer of 8-10 sheets of phyllo dough on top.
3. Cut the Baklava:
-
Using a sharp knife, cut the baklava into squares or diamonds. Be careful when cutting through the layers, as the phyllo dough can be delicate.
4. Bake the Baklava:
-
Place the pan in the preheated oven and bake for 30-35 minutes, or until the phyllo dough is golden brown and crispy.
5. Make the Syrup:
-
While the baklava is baking, prepare the syrup. In a small saucepan, combine the sugar, water, honey, and lemon juice. Bring to a boil, then reduce the heat and simmer for about 10 minutes. Stir in the vanilla extract.
-
Remove the syrup from the heat and let it cool slightly.
6. Add the Syrup:
-
Once the baklava is done baking, remove it from the oven. While it’s still hot, pour the cooled syrup evenly over the baklava, ensuring all the layers are soaked.
-
Allow the baklava to cool in the pan for about 1-2 hours so that the syrup can fully soak into the layers.
7. Serve:
-
Once cooled, cut through the baklava again if necessary. Serve and enjoy your homemade Nutella Baklava!
Servings and Timing
-
Servings: 12-16 pieces
-
Prep Time: 20 minutes
-
Cook Time: 30-35 minutes
-
Total Time: 1.5-2 hours (including cooling time)
Variations
-
Nutty Flavors: In addition to or instead of hazelnuts, try adding pistachios or walnuts to the Nutella filling for a unique twist.
-
Spiced Nutella: Add a pinch of ground cinnamon or nutmeg to the Nutella filling for extra warmth and flavor.
-
Vegan Version: Use dairy-free butter and a plant-based version of Nutella or a similar chocolate-hazelnut spread for a vegan-friendly dessert.
-
Chocolate Drizzle: For an extra touch of decadence, drizzle melted chocolate over the top of the baklava once it’s fully baked and cooled.
Storage/Reheating
-
Storage: Store leftover baklava in an airtight container at room temperature for up to 5 days. The syrup will keep the baklava moist and delicious.
-
Freezing: You can freeze baklava for up to 2 months. Place the cooled baklava in an airtight container and freeze. Thaw at room temperature for a few hours before serving.

FAQs
1. Can I use a different type of spread instead of Nutella?
Yes, you can use any chocolate-hazelnut spread or even almond butter for a nutty twist. The flavor will vary slightly depending on the spread used, but the texture will remain similar.
2. Can I make this baklava in advance?
Yes! In fact, baklava often tastes better after a day or two when the flavors have had time to meld. You can make it a day ahead and store it in an airtight container.
3. Can I make baklava without nuts?
If you prefer nut-free baklava, you can skip the nuts entirely or substitute with crushed graham crackers or oats for added texture.
4. Can I freeze Nutella Baklava?
Yes, Nutella Baklava freezes well. After it has cooled, wrap it tightly in plastic wrap and aluminum foil, and freeze for up to 2 months. Thaw before serving.
5. How can I make the syrup less sweet?
If you prefer a less sweet syrup, you can reduce the amount of sugar used. You can also use maple syrup or agave syrup as alternatives for a different sweetness profile.
6. Can I add more chocolate to this recipe?
Yes! If you love chocolate, feel free to drizzle extra melted chocolate on top of the baklava before serving. You can also add a layer of chocolate chips between the Nutella and phyllo layers.
7. Do I need to use a specific type of phyllo dough?
You can find phyllo dough in the frozen section of most grocery stores. Be sure to thaw the phyllo dough before using it. Use regular-sized phyllo sheets, not mini sheets, for the best texture.
8. How can I make baklava less messy to serve?
To make serving easier, use a sharp knife to cut the baklava into pieces while it’s still in the pan. Once cooled and set, it will be much easier to remove and serve without falling apart.
9. Can I make Nutella Baklava with pre-made baklava dough?
You can use pre-made baklava dough if available, but it’s typically easier to work with regular phyllo dough that you can find in most grocery stores. Pre-made dough may have a slightly different texture.
10. How do I know when my baklava is done?
Your baklava is done when it’s golden brown and crisp on top, and the syrup has soaked in. If you tap the top, it should sound crisp, and the layers should look visibly golden.
Conclusion
Nutella Baklava takes the classic, beloved dessert to new heights by incorporating the smooth, chocolate-hazelnut goodness of Nutella. With its layers of buttery, flaky phyllo dough, a rich filling, and a sweet syrup drizzle, this fusion dessert will be a showstopper at any gathering. Whether you’re serving it for a special occasion or indulging in a sweet treat, Nutella Baklava offers a comforting, indulgent twist on a timeless classic. Enjoy!
Nutella Baklava

5 Stars 4 Stars 3 Stars 2 Stars 1 Star
No reviews
Crusty Mini Baguettes are a delightful, homemade version of the classic French baguette, but in a more compact size. With their golden, crispy crust and soft, airy interior, these mini baguettes are perfect for sandwiches, serving alongside soup, or enjoying with a pat of butter. Baking your own baguettes at home gives you the satisfaction of creating a bakery-worthy loaf with just a few simple ingredients. These crusty mini baguettes are easy to make and will elevate any meal!
- Author: Sarah
- Prep Time: 20 minutes (plus 2 hours for rising)
- Cook Time: 20-25 minutes
- Total Time: 2.5 hours
- Yield: 4 mini baguettes
- Category: Bread
- Method: Baking
- Cuisine: French
- Diet: Vegetarian
Ingredients
3 cups all-purpose flour (plus extra for dusting)
1 1/4 teaspoons salt
1 teaspoon sugar
2 teaspoons active dry yeast
1 1/4 cups warm water (110°F or 45°C)
1 tablespoon olive oil (optional, for extra richness)
1 tablespoon cornmeal (for dusting, optional)
Instructions
- Prepare the Dough: In a small bowl, combine the warm water, sugar, and yeast. Stir to dissolve the sugar and let it sit for about 5 minutes, or until the yeast becomes frothy and bubbly.
- Add the flour and salt to the yeast mixture, stirring until a rough dough forms. If the dough is too sticky, you can add a bit more flour, a tablespoon at a time.
- Once the dough starts to come together, turn it out onto a lightly floured surface and knead for about 8-10 minutes until it’s smooth and elastic. If you have a stand mixer, you can knead the dough using the dough hook attachment for about 5 minutes on medium speed.
- Let the Dough Rise: Lightly oil the bowl and place the dough inside. Cover with a clean kitchen towel or plastic wrap, and let it rise in a warm place for about 1-1.5 hours, or until it doubles in size.
- Shape the Mini Baguettes: Punch the dough down and divide it into 4 equal portions. Roll each portion into a long, slender baguette shape (about 8-10 inches long). Place the shaped baguettes on a baking sheet lined with parchment paper, leaving some space between each one. Sprinkle a little cornmeal under the dough to prevent sticking, if desired.
- Let the Baguettes Rise Again: Cover the shaped baguettes with a clean kitchen towel and let them rise for another 30-45 minutes, or until they’ve puffed up and nearly doubled in size.
- Preheat the Oven: Preheat your oven to 450°F (230°C). Place an empty baking pan or tray on the bottom rack of the oven (this will create steam while baking, which helps create a crispy crust).
- Score the Baguettes: Just before baking, use a sharp knife or razor blade to make a few diagonal slashes (about 3-4) on the top of each baguette. This helps the bread expand as it bakes and gives it that signature baguette look.
- Bake the Mini Baguettes: Place the baking sheet with the baguettes in the preheated oven. Immediately pour about 1 cup of hot water into the empty pan or tray in the bottom of the oven to create steam. Bake the baguettes for 20-25 minutes, or until the tops are golden brown and crisp.
- Cool and Serve: Remove the mini baguettes from the oven and let them cool on a wire rack for at least 15 minutes before slicing and serving.
Notes
Herbed Baguettes: Add a tablespoon of fresh or dried herbs (such as rosemary, thyme, or oregano) to the dough for added flavor.
Cheese Baguettes: Fold in some grated Parmesan or other cheese into the dough for a cheesy twist.
Whole Wheat Baguettes: Substitute half or all of the all-purpose flour with whole wheat flour for a heartier flavor and texture.
Garlic Baguettes: Mix in 1-2 teaspoons of garlic powder or roasted garlic into the dough for a savory, aromatic touch.
Nutrition
- Serving Size: 1 mini baguette
- Calories: 180
- Sugar: 1g
- Sodium: 300mg
- Fat: 3g
- Saturated Fat: 0.5g
- Unsaturated Fat: 2g
- Trans Fat: 0g
- Carbohydrates: 34g
- Fiber: 2g
- Protein: 4g
- Cholesterol: 5mg


